Most people don’t think about curtain measurements until they’re standing at a window with a tape measure, unsure whether to measure the glass, the trim, or the wall around it. Get it wrong and you end up with panels that look skimpy when closed, or a rod that sits so close to the frame it blocks half the light.
The good news is that the whole process comes down to a handful of numbers: window width, rod placement, fullness, and drop. Once you have those, everything else, header style, hanging height, and panel size, falls into place. At Shoukat Interior, we recommend taking accurate measurements before choosing your window curtains, as proper sizing ensures a better fit, improved functionality, and a more polished finish. Here’s how to work through it properly.
Tools You’ll Need Before You Start
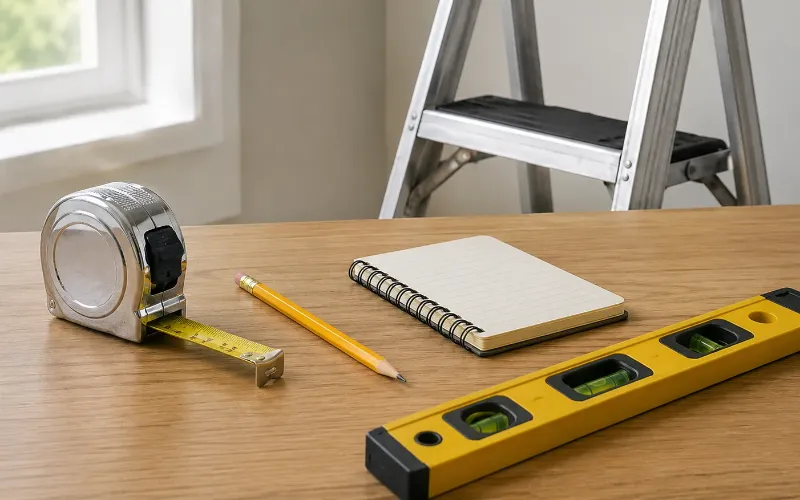
- A steel or metal tape measure (fabric tape stretches over time and throws off longer measurements)
- A pencil for marking bracket positions
- A stepladder for taller windows
- Something to write your numbers down on as you go
- A level, if you’re installing the rod yourself
Skip the cloth tape if you can. It sags across long spans, and on a wide window that difference can easily be half an inch, enough to make a finished panel sit noticeably off.
Step 1: Measure Your Window Width
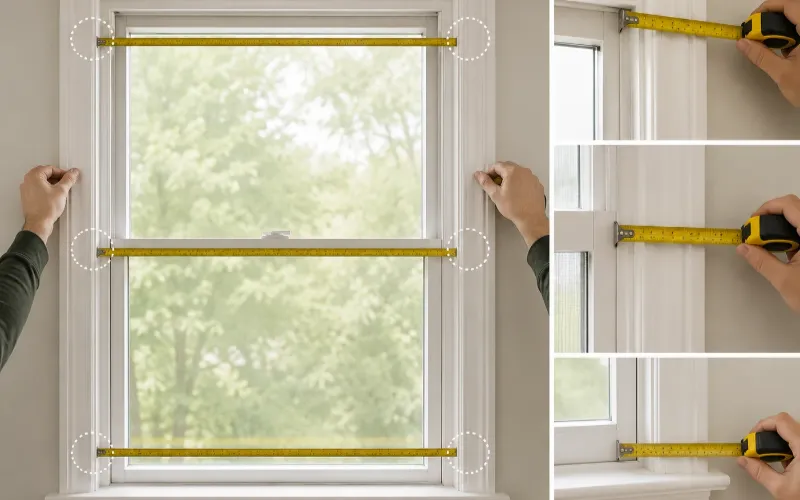
Measure from the outer edge of the window trim on one side to the outer edge on the other. No trim? Measure the frame itself instead.
Take the measurement in three spots, near the top, the middle, and the bottom. Older windows in particular are rarely perfectly square, so don’t assume one reading tells the full story. Use the widest number you get.
This figure is just your starting point. It isn’t the width you’ll actually order or cut fabric to.
Step 2: Decide Where the Curtain Rod Will Go

A lot of curtains look wrong not because of the fabric but because the rod was mounted too close to the window. Extending the rod out on each side gives curtains room to “stack back” against the wall when they’re open, so they frame the window instead of covering part of the glass.
For everyday rooms, extend the rod 4 to 8 inches past the frame on either side. Want a bolder, more open look, or have thicker fabric? Go up to 12 inches. A 48-inch window, for example, usually ends up with a rod somewhere between 56 and 64 inches, not one cut to match the window exactly.
Step 3: Work Out Curtain Width for Proper Fullness

Now that you know your rod length, you can figure out how much fabric you actually need. This extra material is called fullness, and it’s what lets curtains fall in soft folds instead of hanging flat like a sheet pinned to a line.
Most curtain styles look best at 1.5 to 2 times the rod width. Sheer Curtains or lightweight fabrics need more, closer to 2.5 or even 3 times, since thin material needs extra volume to look substantial rather than wispy. Heavier fabrics like velvet can sit at the lower end of that range and still look full.
The math is simple:
Total curtain width = Rod width × Fullness ratio
A 60-inch rod at 2x fullness needs 120 inches of fabric total. Split across two panels, that’s 60 inches per panel.
Header style shifts this slightly too. Grommet and pencil-pleat curtains tend to need close to double the rod width to fold properly, while tab-top panels can look balanced with less, around 1.5 times.
Step 4: Measure Curtain Length (the Drop)
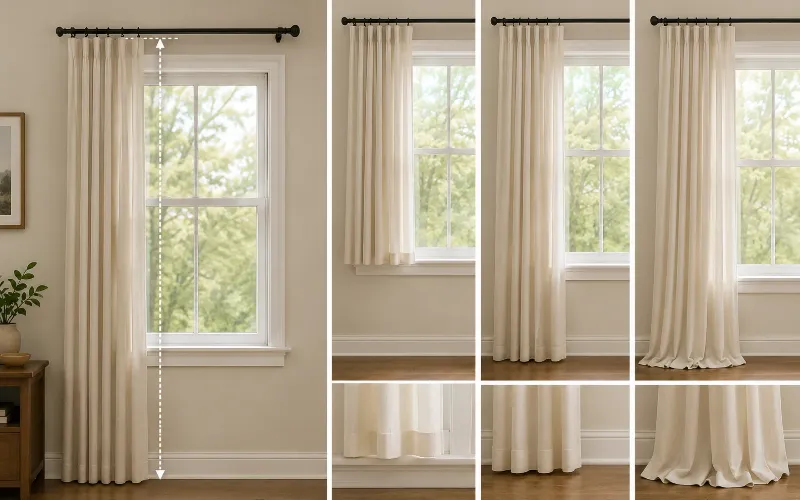
Curtain length, sometimes called the drop, is measured from where the rod sits down to wherever you want the fabric to end. Not from the top of the window frame — from the rod itself, since that’s the point the curtain actually hangs from.
Sill, Floor, or Puddle: Choosing Where Curtains End
- Sill length stops right at the windowsill. Good for kitchens, small rooms, or spots where longer curtains would brush against furniture.
- Floor length is the most common choice. Curtains end about half an inch above the floor or just barely touch it, for a neat, finished look.
- Puddle length adds 2 to 6 extra inches of fabric so it pools slightly at the bottom. It suits a more formal room, but works best on curtains you don’t open and close often, since the puddle needs restyling each time.
Once you know which one you want, measure precisely to that point and write it down next to your width.
Step 5: Pick a Header Style That Matches Your Numbers
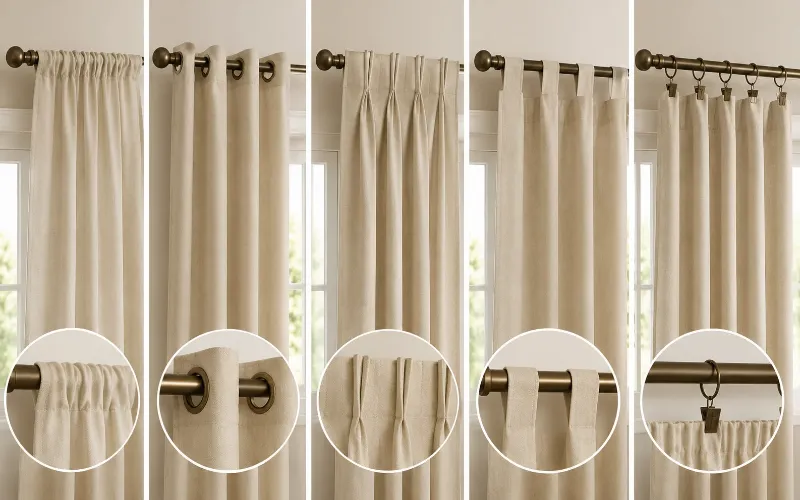
How curtains attach to the rod changes both the look and the fullness they need:
- Rod pocket, a sewn channel the rod slides through. Simple and casual.
- Grommet, metal rings that create even, structured folds. Usually needs close to double fullness.
- Pinch pleat / tailored pleat, stitched folds at the top for a more formal drape.
- Tab top, fabric loops for a relaxed, cottage-style look. Works fine with slightly less fullness.
- Ring clips, clip directly onto rod rings; flexible with most fabric weights.
If you’re buying ready-made curtains, check whether the listed size already accounts for fullness. Some brands build it in; others expect you to size up yourself.
How High Should You Hang Curtain Rods?
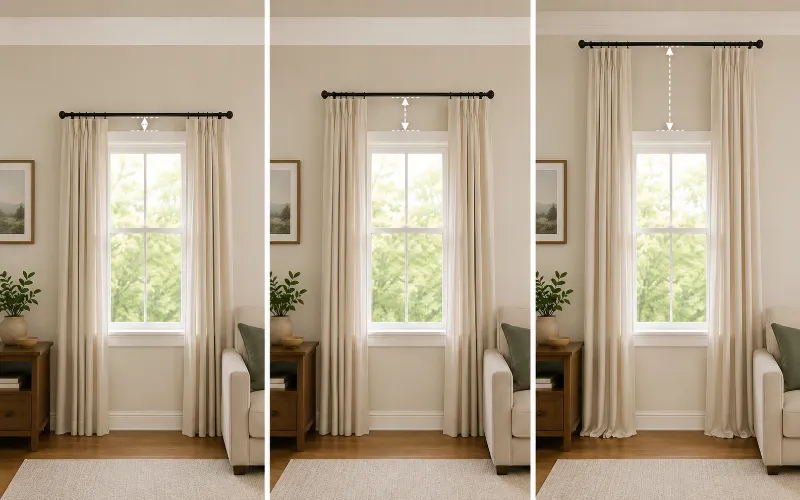
Rod height comes down to proportion more than the window’s actual size. In a room with standard 8-foot ceilings, 4 to 8 inches above the frame is a safe range, high enough to stretch the window visually without looking disconnected from it.
Higher ceilings give you more room to experiment. Some homeowners mount rods 12 inches or more above the frame to draw the eye up and make the space feel taller. Just remember to adjust your curtain length accordingly, or the panels will fall short of the floor.
Special Situations Worth Planning For

Bay or angled windows: Measure each section separately rather than treating the whole bay as one straight width. With a curved or connected rod, measure the full path it follows around the bend.
Double or side-by-side windows: Decide whether you want one rod spanning both windows or two separate treatments. A single rod tends to look cleaner, but it needs a sturdier pole and proper wall support given the extra length.
Inside mount vs. outside mount: Inside mounts sit within the window recess and need a snug, precise width. Outside mounts sit on the wall or trim around the window, giving you the stackback room covered in Step 2. Most living spaces do better with an outside mount for that reason.
Common Measuring Mistakes to Avoid
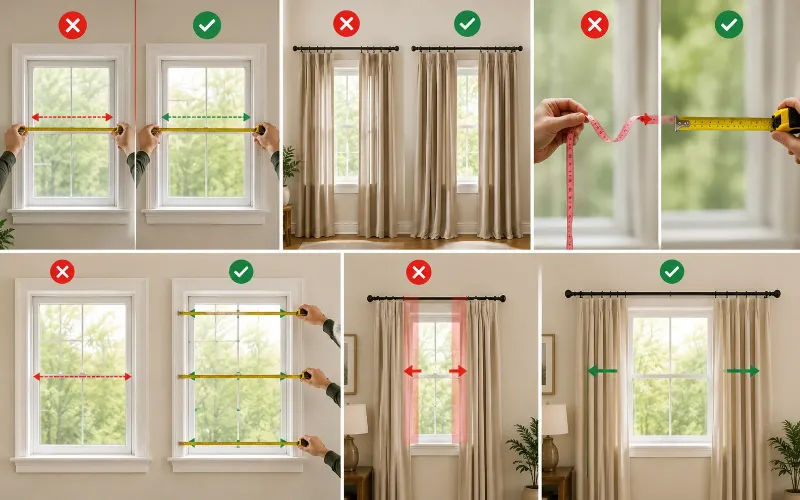
- Measuring the glass instead of the trim or frame
- Skipping the fullness calculation, which leaves curtains looking thin when closed
- Using a cloth tape measure on a wide window, where stretch adds up
- Taking only one width reading instead of checking top, middle, and bottom
- Mounting the rod too close to the frame, which limits stackback and blocks light
Quick Measuring Checklist
- Measure window width at three points and note the widest
- Extend the rod 4-8 inches past the frame on each side
- Multiply rod width by your fullness ratio (1.5x-3x) for total curtain width
- Measure drop from the rod down to your chosen length: sill, floor, or puddle
- Match your header style to the fullness you’ve calculated
- Confirm rod height, 4-8 inches above the frame works for most rooms
Final Thoughts
Once you have four numbers, window width, rod placement, fullness ratio, and drop length, the rest of the process is mostly picking a style you like. Take your time on the measuring stage, double-check anything that seems off, and the curtains you order or sew will hang the way you actually pictured them.
Frequently Asked Questions
Should curtains touch the floor?
For a standard floor-length look, aim for about half an inch of clearance so they don’t drag or gather dust. If you want a softer, more formal effect, let an extra 2 to 6 inches pool at the bottom instead.
Can I use the same width formula for blackout curtains?
Yes. Blackout fabric follows the same fullness rules, though many people lean toward the higher end (2 to 2.5 times the rod width) since denser folds also help block more light around the edges.
What if my window is an odd size?
Made-to-measure curtains are usually the better route for windows that fall outside standard sizes. Take the same width, drop, and rod measurements described above, then check them against the retailer’s custom-order requirements before finalizing.